https://www.youtube.com/watch?v=XeuMd2Bn3PE
sábado, 13 de junio de 2026

viernes, 8 de mayo de 2026
sábado, 3 de octubre de 2020
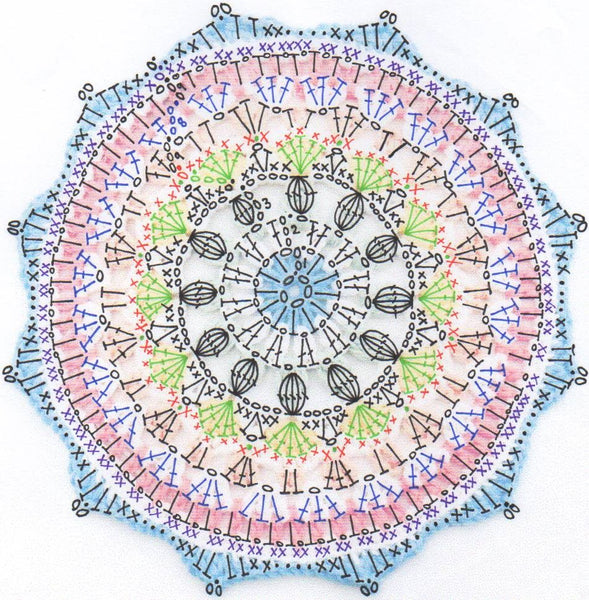
Doily deducido de una foto
- en anillo mágico: [2 vareta doble + 3 cad] * 10
- en cada espacio de 3 cad, [vareta doble - 3 cad -vareta doble - 3 cad] = 20 espacios
- en cada espacio de 3 cad, [vareta - 4 cad]
- sobre cada vareta, una vareta, luego 2 cad, 2 pb en espacio de 4 cad, 2 cad
- sobre cada vareta, una vareta doble + 7 cad
- sobre cada vareta doble, una vareta + 2 cad + pb en el espacio + 3 cad + pb en el espacio + 2 cad
- pb sobre la vareta, 2 cad, en el espacio de 3 cad [2 varetas cerradas juntas, 2 cad, 2 varetas dobles cerradas juntas, 2 cad, 2 varetas cerradas juntas], 2 cad y pb sobre la vareta siguiente

Crochet Summer Haze Doily - Easy Pattern
Origen http://www.kristinescrochets.com/2019/06/crochet-summer-haze-doily-easy-pattern.html

st. - stitch
sl st. - slip stitch
ch - chain
hdc - half double crochet
sc - single crochet
dc - double crochet
trc - treble crochet
ch4picot
– ch4, insert the hook back into the center of the base stitch (or into
first ch) , yarn over, pull through all loops on the hook.
()* - repeat the instructions between the brackets the number of times indicated.
Start with a ch4, join with a sl st. into first ch to form a ring.
Round 1: ch1, 8sc into the ring. Join with a sl st. into first sc.
Round 2: ch3 (counts as a dc), ch3,
(1dc into next st., ch3)* repeat 7 times around.
Join with a sl st. on top of the ch3.
Round 3: sl st. into next ch3 space, ch3 (counts as a dc), 2dc into that same ch3 space, ch4,
(3dc into next ch3 space, ch4)* repeat 7 times around.
Join with a sl st. on top of the ch3.
Round 4: sl st. into next stitch, ch1, 1sc into the base of that same ch1, 9dc into next ch4 space,
(skip 1 st., 1sc into next st., 9dc into next ch4 space)* repeat 7 times around.
Join with a sl st. into first sc.
Round 5: sl st. into next 5 sts., ch1, 1sc into the base of that same ch1, ch8,
(skip 9 sts., 1sc into next st., ch8)* repeat 7 times around.
Join with a sl st. into first sc.
Round 6: ch2 (counts as a hdc), 8hdc into next ch8 space,
(1hdc into next st., 8hdc into next ch8 space)* repeat 7 times around.
Join with a sl st. on top of the ch2.
Round 7: ch1, 1sc into the base of that same ch1,
(ch6, skip 3 sts., 1sc into next st.)* repeat 17 times around.
Join with ch2 + 1trc into first sc.
Round 8: ch3 (counts as a dc), 2dc into that (ch2 + 1trc) space of the previous round, ch4,
(3dc into next ch6 space, ch4)* repeat 17 times around.
Join with a sl st. on top of the ch3.
Round 9: sl st. into next st., ch1, 1sc into the base of that same ch1, 9dc into next ch4 space,
(skip 1 st., 1sc into next st., 9dc into next ch4 space)* repeat 17 times around.
Join with a sl st. into first sc.
Round 10: (ch5, skip 4 sts., 1sc into next st., ch4picot, ch5, skip 4 sts., sl st. into next st.)* repeat 18 times around.
miércoles, 4 de marzo de 2020
Rosa mandala
Parte de acá
https://www.inascraft.com/2019/01/rosa-mandala-mini-cal.html
cad - cadena(s), cadeneta(s)
pb - punto bajo, medio punto
v - vareta, punto alto, punto entero
vd - vareta doble, punto alto doble, punto entero doble
pd - punto deslizado, punto raso, punto enano
sal. - saltar
pt(s). - punto(s), puntada(s)
laz - lazada(s)
E - espacio
pbTD - punto bajo tomado por delante
vTD - vareta tomada por delante
vdTD - vareta doble tomada por delante
pdTD - punto deslizado tomado por delante
pbTA - punto bajo tomado por atrás
vTA - vareta tomada por atrás
picot - 3 cad, pd en la hebra anterior y en la vertical del último punto hecho.
pt. puff - (tomar 1 laz, insertar el ganchillo en el pt. indicado, tomar otra laz, pasar el hilo hacia el frente) 3 veces, tomar una última laz, pasar el hilo a través de los 7 bucles en el ganchillo, 1 cad para asegurar el punto (esta última cad no cuenta como pt en el patrón)
Cerrar - Cerrar el tejido (1 cad, cortar el hilo y tirarlo para cerrar)
Unión con Aguja - Cerrar una vuelta con aguja/Unión invisible
Vuelta 1 : {color A} en un anillo mágico, 3 cad (cuenta como v), 11 v, unir con pd en la 3a cad del inicio, Cerrar. [12 v]
Vuelta 2 : {unir el color B con un pd en cualquier v} alargar el bucle, pt. puff en el mismo lugar, 2 cad, (pt. puff en el sig. pt., 2 cad) 11 veces, unir con pd en el primer bucle alargado, Cerrar. [12 pt. puff, 12 E de 2 cad]
Vuelta 3 : {unir el color C con pd en cualquier con pd en cualquier E de 2 cad} 3 cad (cuenta como v), 2 v en el mismo lugar, vTD alrededor del sig. pt. puff, [3 v en el sig. E de 2 cad, vTD alrededor del sig. pt. puff] 11 veces, unir con pd en la 3a cad del inicio [12 vTD, 36 v]
Vuelta 4 : 3 cad (cuenta como v) v en los sig. 2 pts., 2 v en el sig. pt., (v en los sig. 3 pts., 2 v en el sig. pt.) 11 veces, cortar el hilo, unir con aguja. [60 v]
Vuelta 5 : {unir el color D con un pbTA de pie en cualquier pt.} pbTA alrededor de los sig. 2 pts., 2 cad, pbTA alrededor de los sig. 3 pts., 4 cad, (pbTA alrededor de los sig. 3 pts., 2 cad, pbTA alrededor de los sig. 3 pts., 4 cad) 9 veces, unir con pd en el primer pbTA, Cerrar. [60 pbTA, 10 E de 2 cad, 10 E de 4 cad]
Vuelta 6 : {unir el color B con pd en cualquier E de 4 cad} 3 cad (cuenta como v), 3 v + 2 cad + 4 v en el mismo lugar, sal. el sig. E de 2 cad, (4 v + 2 cad + 4 v en el sig. E de 4 cad, sal. el sig. E de 2 cad) 9 veces, unir con pd en la 3a cad del inicio, Cerrar [80 v, 10 E de 2 cad]
Vuelta 7 : {unir el color D con pd en cualquier E de 2 cad} 3 cad (cuenta como v), v + 2 cad + 2 v en el mismo lugar, vTA alrededor de los sig. 3 pts., sal. el sig. pt., v en el E de 2 cad de la vuelta 5, sal. el sig. pt., vTA alrededor de los sig. 3 pts., (2 v + 2 cad + 2 v en el sig. E de 2 cad, vTA alrededor de los sig. 3 pts., sal. el sig. pt., v en el E de 2 cad de la vuelta 5, sal. el sig. pt., vTA alrededor de los sig. 3 pts.) 9 veces, unir con pd en la primera v, Cerrar. [50 v, 60 vTA, 10 E de 2 cad]

Vuelta 8 : {unir el color E con pd en cualquier E de 2 cad} 3 cad (cuenta como v), v en el mismo lugar, 4 cad, sal. los sig. 5 pts., vd + 4 cad + vd en la sig. v, 4 cad, sal. los sig. 5 pts., (2 v en el sig. E de 2 cad, 4 cad, sal. los sig. 5 pts., vd + 4 cad + vd en la sig. cad, 4 cad, sal. los sig. 5 pts.) 9 veces, unir con pd en la 3a cad del inicio, Cerrar. [20 v, 30 E de 4 cad, 20 vd]
Vuelta 9 : {unir el color F con pd en cualquier E de 4 cad entre 2 vd} 4 cad (cuenta como 1 vd), 3 vd + 2 cad + 4 vd en el mismo lugar, sal. el sig. E de 4 cad, vTD alrededor de la sig. v, 2 cad, vTD alrededor de la sig. v, (sal. el sig. E de 4 cad, 4 vd + 2 cad + 4 vd en el sig. E de 4 cad, sal. el sig. E de 4 cad, vTD alrededor de la sig. v, 2 cad, vTD alrededor de la sig. v) 9 veces, Cerrar, unir con aguja. [80 vd, 20 E de 2 cad, 20 vTD]
Vuelta 10 : {unir el color E con pd en cualquier E de 2 cad entre 2 vTD} 5 cad (cuenta como v y 2 cad), v en el mismo lugar, vTD alrededor de la sig. vTD, vdTD alrededor de la sig. vd de la vuelta 8, 1 cad, sal. la sig. vd, vTA alrededor de los sig. 3 pts., 2 v + 2 cad + 2 v en el sig. E de 2 cad, vTA alrededor de los sig. 3 pts., 1 cad, sal. la sig. vd, vdTD alrededor de la sig. vd de la vuelta 8, vTD alrededor de la sig. vTD, (v + 2 cad + v en el sig. E de 2 cad, vTD alrededor de la sig. vTD, vdTD alrededor de la sig. vd de la vuelta 8, 1 cad, sal. la sig. vd, vTA alrededor de los sig. 3 pts., 2 v + 2 cad + 2 v en el sig. E de 2 cad, vTA alrededor de los sig. 3 pts., 1 cad, sal. la sig. vd, vdTD alrededor de la sig. vd de la vuelta 8, vTD alrededor de la sig. vTD) 9 veces, unir con pd en la 3a cad de las 5 cad del inicio. [60 v, 20 E de 2 cad, 20 vTD, 20 vdTD, 60 vTA]
Vuelta 11: pd en el sig. E de 2 cad, 1 cad, 2 pb + 4 cad + 2 pb en el mismo lugar, pbTA alrededor de los sig. 2 pts., 3 cad, sal. la sig. vdTD + 1 cad + 2 vTA, pbTA alrededor de los sig. 3 pts., 2 pb + 2 cad + 2 pb en el sig. E de 2 cad, pbTA alrededor de los sig. 3 pts., 3 cad, sal. las sig. 2 vTA + 1 cad + vdTD, pbTA alrededor de los sig. 2 pts., (2 pb + 4 cad + 2 pb en el sig. E de 2 cad, pbTA alrededor de los sig. 2 pts., 3 cad, sal. la sig. vdTD + 1 cad + 2 vTA, pbTA alrededor de los sig. 3 pts., 2 pb + 2 cad + 2 pb en el sig. E de 2 cad, pbTA alrededor de los sig. 3 pts., sal. las sig. 2 vTA + 1 cad + vdTD, pbTA alrededor de los sig. 2 pts.) 9 veces, unir con pd en el primer pb, Cortar el hilo. [80 pb, 10 E de 4 cad, 100 pbTA, 20 E de 3 cad] vuelta 12-13

Hacer la vuelta 12 en todos E de 4 cad.
Vuelta 12 : {unir el color B con pd en cualquier E de 4 cad} 3 cad, 5 v en el mismo lugar, Cerrar. [6 v]
Hacer la vuelta 13 en cada vuelta 12
Vuelta 13 : {unir el color G con pd en la 3a cad del inicio (primera v) de la vuelta 12} alargar el bucle, pt. puff en el mismo lugar, (2 cad, pt. puff en el sig. pt.) 5 veces, Cerrar. [6 pt. puff, 5 E de 2 cad]

Vuelta 14 : {unir el color E en cualquier E de 2 cad de la vuelta 11} 1 cad, pb + 2 cad + pb en el mismo lugar, 2 cad, (ahora trabajar en la vuelta 13) sal. el primer pt. puff, (2 v en el sig. E de 2 cad, vTD en el sig. pt. puff) 2 veces, 2 v + 2 cad + 2 v en el sig. E de 2 cad, (vTD en el sig. pt. puff, 2 v en el sig. E de 2 cad) 2 veces, 2 cad, sal. el sig. pt. puff, (pb + 2 cad + pb en el sig. E de 2 cad de la vuelta 11, 2 cad, (ahora trabajar en la vuelta 13) sal. el primer pt. puff, (2 v en el sig. E de 2 cad, vTD en el sig. pt. puff) 2 veces, 2 v + 2 cad + 2 v en el sig. E de 2 cad, (vTD en el sig. pt. puff, 2 v en el sig. E de 2 cad) 2 veces, 2 cad, sal. el sig. pt. puff) 9 veces, unir con pd en el primer pb. [20 pb, 20 E de 2 cad, 40 vTD, 120 v]

Vuelta 15 : pd en el sig. E de 2 cad, 7 cad + pd in la 4a cad desde el ganchillo (cuenta como 1 vd y un picot), vd en el mismo lugar, 1 cad, 2 vdTD alrededor del sig. pb, sal. el sig. E de 2 cad and 2 pts., vTA alrededor de los sig. 6 pts., 2 v + picot + 2 v en el sig. E de 2 cad, vTA alrededor de los sig. 6 pts., sal. el sig. 2 pts. and E de 2 cad, 2 vdTD alrededor del sig. pb, 1 cad, (vd + picot + vd en el sig. E de 2 cad, 1 cad, 2 vdTD alrededor del sig. pb, sal. el sig. E de 2 cad y 2 pts., vTA alrededor de los sig. 6 pts., 2 v + picot + 2 v en el sig. E de 2 cad, vTA alrededor de los sig. 6 pts., sal. el sig. 2 pts. y E de 2 cad, 2 vdTD alrededor del sig. pb, 1 cad] 9 veces, unir con pd en la 4a cad de las 7 cad del inicio, Cerrar. [20 vd, 40 vdTD, 20 E de 1 cad, 20 picot, 120 vTA, 40 v] Esconder todos los hilos. Bloquear (opcional)

https://www.inascraft.com/2019/01/rosa-mandala-mini-cal.html
cad - cadena(s), cadeneta(s)
pb - punto bajo, medio punto
v - vareta, punto alto, punto entero
vd - vareta doble, punto alto doble, punto entero doble
pd - punto deslizado, punto raso, punto enano
sal. - saltar
pt(s). - punto(s), puntada(s)
laz - lazada(s)
E - espacio
pbTD - punto bajo tomado por delante
vTD - vareta tomada por delante
vdTD - vareta doble tomada por delante
pdTD - punto deslizado tomado por delante
pbTA - punto bajo tomado por atrás
vTA - vareta tomada por atrás
picot - 3 cad, pd en la hebra anterior y en la vertical del último punto hecho.
pt. puff - (tomar 1 laz, insertar el ganchillo en el pt. indicado, tomar otra laz, pasar el hilo hacia el frente) 3 veces, tomar una última laz, pasar el hilo a través de los 7 bucles en el ganchillo, 1 cad para asegurar el punto (esta última cad no cuenta como pt en el patrón)
Cerrar - Cerrar el tejido (1 cad, cortar el hilo y tirarlo para cerrar)
Unión con Aguja - Cerrar una vuelta con aguja/Unión invisible
Vuelta 1 : {color A} en un anillo mágico, 3 cad (cuenta como v), 11 v, unir con pd en la 3a cad del inicio, Cerrar. [12 v]
Vuelta 2 : {unir el color B con un pd en cualquier v} alargar el bucle, pt. puff en el mismo lugar, 2 cad, (pt. puff en el sig. pt., 2 cad) 11 veces, unir con pd en el primer bucle alargado, Cerrar. [12 pt. puff, 12 E de 2 cad]
Vuelta 3 : {unir el color C con pd en cualquier con pd en cualquier E de 2 cad} 3 cad (cuenta como v), 2 v en el mismo lugar, vTD alrededor del sig. pt. puff, [3 v en el sig. E de 2 cad, vTD alrededor del sig. pt. puff] 11 veces, unir con pd en la 3a cad del inicio [12 vTD, 36 v]
Vuelta 4 : 3 cad (cuenta como v) v en los sig. 2 pts., 2 v en el sig. pt., (v en los sig. 3 pts., 2 v en el sig. pt.) 11 veces, cortar el hilo, unir con aguja. [60 v]
Vuelta 5 : {unir el color D con un pbTA de pie en cualquier pt.} pbTA alrededor de los sig. 2 pts., 2 cad, pbTA alrededor de los sig. 3 pts., 4 cad, (pbTA alrededor de los sig. 3 pts., 2 cad, pbTA alrededor de los sig. 3 pts., 4 cad) 9 veces, unir con pd en el primer pbTA, Cerrar. [60 pbTA, 10 E de 2 cad, 10 E de 4 cad]
Vuelta 6 : {unir el color B con pd en cualquier E de 4 cad} 3 cad (cuenta como v), 3 v + 2 cad + 4 v en el mismo lugar, sal. el sig. E de 2 cad, (4 v + 2 cad + 4 v en el sig. E de 4 cad, sal. el sig. E de 2 cad) 9 veces, unir con pd en la 3a cad del inicio, Cerrar [80 v, 10 E de 2 cad]
Vuelta 7 : {unir el color D con pd en cualquier E de 2 cad} 3 cad (cuenta como v), v + 2 cad + 2 v en el mismo lugar, vTA alrededor de los sig. 3 pts., sal. el sig. pt., v en el E de 2 cad de la vuelta 5, sal. el sig. pt., vTA alrededor de los sig. 3 pts., (2 v + 2 cad + 2 v en el sig. E de 2 cad, vTA alrededor de los sig. 3 pts., sal. el sig. pt., v en el E de 2 cad de la vuelta 5, sal. el sig. pt., vTA alrededor de los sig. 3 pts.) 9 veces, unir con pd en la primera v, Cerrar. [50 v, 60 vTA, 10 E de 2 cad]
Vuelta 8 : {unir el color E con pd en cualquier E de 2 cad} 3 cad (cuenta como v), v en el mismo lugar, 4 cad, sal. los sig. 5 pts., vd + 4 cad + vd en la sig. v, 4 cad, sal. los sig. 5 pts., (2 v en el sig. E de 2 cad, 4 cad, sal. los sig. 5 pts., vd + 4 cad + vd en la sig. cad, 4 cad, sal. los sig. 5 pts.) 9 veces, unir con pd en la 3a cad del inicio, Cerrar. [20 v, 30 E de 4 cad, 20 vd]
Vuelta 9 : {unir el color F con pd en cualquier E de 4 cad entre 2 vd} 4 cad (cuenta como 1 vd), 3 vd + 2 cad + 4 vd en el mismo lugar, sal. el sig. E de 4 cad, vTD alrededor de la sig. v, 2 cad, vTD alrededor de la sig. v, (sal. el sig. E de 4 cad, 4 vd + 2 cad + 4 vd en el sig. E de 4 cad, sal. el sig. E de 4 cad, vTD alrededor de la sig. v, 2 cad, vTD alrededor de la sig. v) 9 veces, Cerrar, unir con aguja. [80 vd, 20 E de 2 cad, 20 vTD]
Vuelta 10 : {unir el color E con pd en cualquier E de 2 cad entre 2 vTD} 5 cad (cuenta como v y 2 cad), v en el mismo lugar, vTD alrededor de la sig. vTD, vdTD alrededor de la sig. vd de la vuelta 8, 1 cad, sal. la sig. vd, vTA alrededor de los sig. 3 pts., 2 v + 2 cad + 2 v en el sig. E de 2 cad, vTA alrededor de los sig. 3 pts., 1 cad, sal. la sig. vd, vdTD alrededor de la sig. vd de la vuelta 8, vTD alrededor de la sig. vTD, (v + 2 cad + v en el sig. E de 2 cad, vTD alrededor de la sig. vTD, vdTD alrededor de la sig. vd de la vuelta 8, 1 cad, sal. la sig. vd, vTA alrededor de los sig. 3 pts., 2 v + 2 cad + 2 v en el sig. E de 2 cad, vTA alrededor de los sig. 3 pts., 1 cad, sal. la sig. vd, vdTD alrededor de la sig. vd de la vuelta 8, vTD alrededor de la sig. vTD) 9 veces, unir con pd en la 3a cad de las 5 cad del inicio. [60 v, 20 E de 2 cad, 20 vTD, 20 vdTD, 60 vTA]
Vuelta 11: pd en el sig. E de 2 cad, 1 cad, 2 pb + 4 cad + 2 pb en el mismo lugar, pbTA alrededor de los sig. 2 pts., 3 cad, sal. la sig. vdTD + 1 cad + 2 vTA, pbTA alrededor de los sig. 3 pts., 2 pb + 2 cad + 2 pb en el sig. E de 2 cad, pbTA alrededor de los sig. 3 pts., 3 cad, sal. las sig. 2 vTA + 1 cad + vdTD, pbTA alrededor de los sig. 2 pts., (2 pb + 4 cad + 2 pb en el sig. E de 2 cad, pbTA alrededor de los sig. 2 pts., 3 cad, sal. la sig. vdTD + 1 cad + 2 vTA, pbTA alrededor de los sig. 3 pts., 2 pb + 2 cad + 2 pb en el sig. E de 2 cad, pbTA alrededor de los sig. 3 pts., sal. las sig. 2 vTA + 1 cad + vdTD, pbTA alrededor de los sig. 2 pts.) 9 veces, unir con pd en el primer pb, Cortar el hilo. [80 pb, 10 E de 4 cad, 100 pbTA, 20 E de 3 cad] vuelta 12-13
Hacer la vuelta 12 en todos E de 4 cad.
Vuelta 12 : {unir el color B con pd en cualquier E de 4 cad} 3 cad, 5 v en el mismo lugar, Cerrar. [6 v]
Hacer la vuelta 13 en cada vuelta 12
Vuelta 13 : {unir el color G con pd en la 3a cad del inicio (primera v) de la vuelta 12} alargar el bucle, pt. puff en el mismo lugar, (2 cad, pt. puff en el sig. pt.) 5 veces, Cerrar. [6 pt. puff, 5 E de 2 cad]
Vuelta 14 : {unir el color E en cualquier E de 2 cad de la vuelta 11} 1 cad, pb + 2 cad + pb en el mismo lugar, 2 cad, (ahora trabajar en la vuelta 13) sal. el primer pt. puff, (2 v en el sig. E de 2 cad, vTD en el sig. pt. puff) 2 veces, 2 v + 2 cad + 2 v en el sig. E de 2 cad, (vTD en el sig. pt. puff, 2 v en el sig. E de 2 cad) 2 veces, 2 cad, sal. el sig. pt. puff, (pb + 2 cad + pb en el sig. E de 2 cad de la vuelta 11, 2 cad, (ahora trabajar en la vuelta 13) sal. el primer pt. puff, (2 v en el sig. E de 2 cad, vTD en el sig. pt. puff) 2 veces, 2 v + 2 cad + 2 v en el sig. E de 2 cad, (vTD en el sig. pt. puff, 2 v en el sig. E de 2 cad) 2 veces, 2 cad, sal. el sig. pt. puff) 9 veces, unir con pd en el primer pb. [20 pb, 20 E de 2 cad, 40 vTD, 120 v]
Vuelta 15 : pd en el sig. E de 2 cad, 7 cad + pd in la 4a cad desde el ganchillo (cuenta como 1 vd y un picot), vd en el mismo lugar, 1 cad, 2 vdTD alrededor del sig. pb, sal. el sig. E de 2 cad and 2 pts., vTA alrededor de los sig. 6 pts., 2 v + picot + 2 v en el sig. E de 2 cad, vTA alrededor de los sig. 6 pts., sal. el sig. 2 pts. and E de 2 cad, 2 vdTD alrededor del sig. pb, 1 cad, (vd + picot + vd en el sig. E de 2 cad, 1 cad, 2 vdTD alrededor del sig. pb, sal. el sig. E de 2 cad y 2 pts., vTA alrededor de los sig. 6 pts., 2 v + picot + 2 v en el sig. E de 2 cad, vTA alrededor de los sig. 6 pts., sal. el sig. 2 pts. y E de 2 cad, 2 vdTD alrededor del sig. pb, 1 cad] 9 veces, unir con pd en la 4a cad de las 7 cad del inicio, Cerrar. [20 vd, 40 vdTD, 20 E de 1 cad, 20 picot, 120 vTA, 40 v] Esconder todos los hilos. Bloquear (opcional)

lunes, 24 de febrero de 2020
Naissance mandala pattern
https://www.cottonpod.co.uk/blogs/news/114210887-naissance-mandala-pattern
El patrón está en terminología UK así que traduzco
1. en círculo mágico [media vareta + 1cad] * 12
2. en cada espacio de 1 cad,[ 2 varetas + 1 cad ]
3. en cada espacio de 1 cad, [5 varetas cerradas juntas + 4 cad]
4. en cada espacio de 4 cad, [2pb, media vareta, 1 cad, media vareta, 2 pb]
5. montar el hilo sobre uno de los puntos de cadeneta entre las medias varetas y hacer un pb, [5 varetas sobre el cluster de la vuelta 3, pb o ss en la cadeneta entre medias varetas]
6. con el mismo color de la vuelta 4, montar el hilo sobre esa vuelta (puntos de cadeneta entre las medias varetas) y hacer 2 pb en cada uno de esos y un pb sobre cada vareta del abanico (queda mejor si se lo hace solo sobre la parte delantera del punto)
7. Sobre cada vértice del triángulo va un abanico de 3 varetas y sobre el punto medio del abanico de 5 varetas van 2 medias varetas (tomar la parte de atrás del punto). Todos los grupos separados por un punto de cadeneta.
8. en cada punto de cadeneta un abanico de 3 varetas. Sin separación
9. en cada vareta, [media vareta + 1 cad]
10. cubrir cada cad con 2 pb
11. en la parte trasera de los puntos, [2 ss - 2 pb - 2 medias varetas - PICOT - 2 medias varetas - 2 pb - 2 ss]
PICOT: 1 cad y ss en la parte trasera del punto anterior. O sino hacer 2 cad y listo.
Ver esta combinación de colores

El patrón está en terminología UK así que traduzco
1. en círculo mágico [media vareta + 1cad] * 12
2. en cada espacio de 1 cad,[ 2 varetas + 1 cad ]
3. en cada espacio de 1 cad, [5 varetas cerradas juntas + 4 cad]
4. en cada espacio de 4 cad, [2pb, media vareta, 1 cad, media vareta, 2 pb]
5. montar el hilo sobre uno de los puntos de cadeneta entre las medias varetas y hacer un pb, [5 varetas sobre el cluster de la vuelta 3, pb o ss en la cadeneta entre medias varetas]
6. con el mismo color de la vuelta 4, montar el hilo sobre esa vuelta (puntos de cadeneta entre las medias varetas) y hacer 2 pb en cada uno de esos y un pb sobre cada vareta del abanico (queda mejor si se lo hace solo sobre la parte delantera del punto)
7. Sobre cada vértice del triángulo va un abanico de 3 varetas y sobre el punto medio del abanico de 5 varetas van 2 medias varetas (tomar la parte de atrás del punto). Todos los grupos separados por un punto de cadeneta.
8. en cada punto de cadeneta un abanico de 3 varetas. Sin separación
9. en cada vareta, [media vareta + 1 cad]
10. cubrir cada cad con 2 pb
11. en la parte trasera de los puntos, [2 ss - 2 pb - 2 medias varetas - PICOT - 2 medias varetas - 2 pb - 2 ss]
PICOT: 1 cad y ss en la parte trasera del punto anterior. O sino hacer 2 cad y listo.
Ver esta combinación de colores
jueves, 23 de enero de 2020


sábado, 27 de julio de 2019
Autumn Spice mandala
https://bellacrochet.blogspot.com/2015/11/autumn-spice-mandala-doily-free-crochet.html
Ver también la combinación de colores en
https://attic24.typepad.com/weblog/2016/09/mandala-hoops.html

Ver también la combinación de colores en
https://attic24.typepad.com/weblog/2016/09/mandala-hoops.html

Special Stitches:
For 2 dc cluster: Yo,
insert hook in st or ch sp indicated, yo, pull lp through, yo, pull
through 2 lps on hook, yo, insert hook in same st or ch sp, yo, pull lp
through, yo, pull through 2 lps on hook, yo, pull through all 3 lps on
hook
For 3 dc cluster: Yo,
insert hook in st or ch sp indicated, yo, pull lp through, yo, pull
through 2 lps on hook, (yo, insert hook in same st or ch sp, yo, pull
through, yo, pull through 2 lps on hook) 2 times, yo, pull through all 4
lps on hook
For Vst: (dc, ch 2, dc) in st or ch sp indicated
Pattern Notes:
Work into ch-2 sps of Vsts unless otherwise noted
Skip all stitches listed within { }
Doily
Rnd 1: With Rust, ch 6, sl st in first ch to form ring; ch 2, 2 dc cl (see Special Stitches) in ring, ch 3, (3 dc cl—see Special Stitches—in ring, ch 3) 7 times, join with sl st in top of 2-dc cl. Fasten off. (8 ch-3 sps made)
Rnd 2: Join Dk
Brown with sl st in first ch-3 sp, (ch 2, 2 dc cl, ch 2, 3 dc cl) in
same sp as joining, ch 2, *(3 dc cl, ch 2, 3 dc cl) in next ch-3 sp, ch
2; repeat from * around, join with sl st in top of 2-dc cl. Fasten off. (16 ch-2 sps made)
Rnd 3: Join Rust with sl st in first ch-2 sp, (ch 5, dc) in same sp as joining, Vst (see Special Stitches) in each ch-2 sp around, join with sl st in 3rd ch of ch-5. Fasten off. (16 Vsts made)
Rnd 4: Join Camel
with sc in ch-2 sp of first Vst, 7 dc in ch-2 sp of next Vst, (sc in
next Vst, 7 dc in next Vst) around, join with sl st in first sc. Fasten
off.
Rnd 5: Join Rust
with sc in first sc, ch 4, skip next 3 dc, (sc, ch 3, sc) in next dc, ch
4, skip next 3 dc, *sc in next sc, ch 4, skip next 3 dc, (sc, ch 3, sc)
in next dc, ch 4, skip next 3 dc; repeat from * around, join with sl st
in first sc. Fasten off.
Rnd 6: Join Orange with sc in first ch-3 sp, (ch 3, dc in 3rd ch from hook) 3 times, skip next {ch-4, sc, ch-4}, *sc in next ch-3 sp, (ch 3, dc in 3rd ch from hook) 3 times, skip next {ch-4, sc, ch-4}; repeat from * around, join with sl st in first sc. Fasten off. (24 eyelet sps made)
Rnd 7: Join Rust
with sl st in first eyelet sp, (ch 3, 3 dc) in same sp as joining, ch 1,
(4 dc in next Eyelet sp, ch 1) around, join with sl st in top of ch-3.
Fasten off. (24 groups of 4-dc, 24 ch-1 sps made)
Rnd 8: Join Orange with sc in first ch-1 sp, ch 5, (sc in next ch-1 sp, ch 5) around, join with sl st in first sc. Fasten off. (24 ch-5 sps made)
Rnd 9: Join Dk
Green with sl st in first ch-5 sp, (ch 2, 2 dc cl, ch 3, 3 dc cl) in
same sp as joining, ch 3, *(3 dc cl, ch 3, 3 dc cl) in next ch-5 sp, ch
3; repeat from * around, join with sl st in top of 2-dc cl. Fasten off. (48 clusters, 48 ch-3 sps made)
Rnd 10: Join Rust with sl st in first ch-3 sp, (ch 5, dc) in same sp as joining, Vst in each ch-3 sp around, join with sl st in 3rd ch of ch-5. Fasten off. (48 Vsts made)
Rnd 11: Join
Coral with sc in ch sp of first Vst, 7 dc in ch-2 sp of next Vst, (sc in
next Vst, 7 dc in next Vst) around, join with sl st in first sc. Fasten
off.
Rnd 12: Join
Rust with sc in first sc, ch 4, skip next 3 dc, (sc, ch 3, sc) in next
dc, ch 4, skip next 3 dc, *sc in next sc, ch 4, skip next 3 dc, (sc, ch
3, sc) in next dc, ch 4, skip next 3 dc; repeat from * around, join with
sl st in first sc. Fasten off.
Mandala chiquito para poner sobre CDs 5
Tomado del mandala gigante de Naztazia.com
1. 8 PB en círculo mágico
2. en cada PB, 3 PA cerrados juntos + 3 cad
3. enlazar con PB en cada espacio de 3 cad y en cada "cluster", 5 cad. Al llegar al último, hacer 2 cad y enlazar con 1 PA, lo que nos deja el punto en el medio}
4. igual a 3
5. igual a 3 con 6 cad
6. igual a 5
seguir hasta el tamaño deseado
Se puede volver a hacer un cluster en los espacios
Si se quiere cambiar de color se puede hacer haciendo un PA doble y cerrarlo con el nuevo color
1. 8 PB en círculo mágico
2. en cada PB, 3 PA cerrados juntos + 3 cad
3. enlazar con PB en cada espacio de 3 cad y en cada "cluster", 5 cad. Al llegar al último, hacer 2 cad y enlazar con 1 PA, lo que nos deja el punto en el medio}
4. igual a 3
5. igual a 3 con 6 cad
6. igual a 5
seguir hasta el tamaño deseado
Se puede volver a hacer un cluster en los espacios
Si se quiere cambiar de color se puede hacer haciendo un PA doble y cerrarlo con el nuevo color
Mandala chiquito para poner sobre CD 4: crystal crochet mandala
https://celticknotcrochet.com/2018/06/crystal-crochet-mandala/.html
Mandala chiquito para poner sobre CDs 3
1. 12 PA en círculo mágico
2. en cada PA 1 PA + 2 cad
3. en cada espacio de 2 cad, 3 PA cerrados juntos + 2 cad
4. enlazar en un espacio con PB, 5 cad
5. en cada espacio de 5 cad, 1 PB - 1 MP - 1 PA - 1 cad - 1 PA - 1 MP - 1 PB
6. enlazar en el cad con PB, 7 cad
7. enlazar en el espacio con PB, 8 cad
8. cubrir con 9 PB
Hacer dos piezas iguales, colocar dos CDs enfrentados entre ambas piezas, en la vuelta 8 la segunda pieza enlaza con la primera

2. en cada PA 1 PA + 2 cad
3. en cada espacio de 2 cad, 3 PA cerrados juntos + 2 cad
4. enlazar en un espacio con PB, 5 cad
5. en cada espacio de 5 cad, 1 PB - 1 MP - 1 PA - 1 cad - 1 PA - 1 MP - 1 PB
6. enlazar en el cad con PB, 7 cad
7. enlazar en el espacio con PB, 8 cad
8. cubrir con 9 PB
Hacer dos piezas iguales, colocar dos CDs enfrentados entre ambas piezas, en la vuelta 8 la segunda pieza enlaza con la primera

Mandala chiquito para poner sobre CD 2
1. en círculo mágico, [3 PA + 2 cad] * 6
2. en cada grupo de 3 PA y en cada espacio de 2cad, 3 PA cerrados juntos +3 cad
3. en cada espacio de 3 cad, 4 PA
4. sobre cada grupo de 4 PA, 4 PA cerrados juntos + 5 cad
5. en cada grupo de 5cad, 3 PB + 1 cad + 3PB
6. enlazar en cada cad con PB, 3 cad, 3 cad cerrados con PB en pto inicial, 3 cad
Hacer dos piezas iguales, colocar dos CDs enfrentados entre las dos, en la segunda en la 6ta vuelta enlazar con la primera

2. en cada grupo de 3 PA y en cada espacio de 2cad, 3 PA cerrados juntos +3 cad
3. en cada espacio de 3 cad, 4 PA
4. sobre cada grupo de 4 PA, 4 PA cerrados juntos + 5 cad
5. en cada grupo de 5cad, 3 PB + 1 cad + 3PB
6. enlazar en cada cad con PB, 3 cad, 3 cad cerrados con PB en pto inicial, 3 cad
Hacer dos piezas iguales, colocar dos CDs enfrentados entre las dos, en la segunda en la 6ta vuelta enlazar con la primera

Tequila sunrise mandala
https://www.ravelry.com/patterns/library/tequila-sunrise-mandala
Se puede hacer hasta la vuelta 6 para poner sobre CD
V-stitch – DC, ch2, DC
Treble Stitch – yarn over hook 2 times, insert in next stitch, draw up a loop (4 loops on hook), yarn
over and draw through the first two loops, yarn over and draw through the next two loops, yarn
over and draw through the final two loops – one loop should be left on your hook
Double Treble Stitch – yarn over hook 3 times, insert in next stitch and draw up a loop (5 loops on
hook), yarn over and draw through the first two loops, yarn over and draw through the next two
loops, yarn over and draw through the next two lops, yarn over and draw through the final two
loops – one loop should be left on your hook
Small shell – 6DC into the indicated stitch
Large shell – 9 double trebles into the indicated stitch
Cluster – work the first part of a DC (= yarn over , draw up a loop, yarn over draw through the first
two loops – 2 loops left on hook),into the indicated stitch, repeat in the next three indicated stitches
– 5 loops on hook, yarn over and draw through all five loops.
Notes:
For starting rows, you may use a chain to the appropriate height of the stitch, or you may use a
standing stitch. I used the standing stitch method except for the very first round.
If you use chains to start a row, DC is 3ch and counts as a stitch, Treble is 4ch and Double Treble is
5ch.
Each round is tied off and each row is started by joining new yarn – colour distribution is at your own
discretion, however, I used the same colour for two rows at a time, over rows 5 and 6, rows 7 and 8,
and rows 9 and 10 for my first one.
Pattern:
Round 1: Starting with a magic circle, chain 4 (counts as a treble) work 15 more trebles. Join into the
fourth chain

Round 2: Start working at any point in the space BETWEEN the stitches of round 1, 1DC, ch2 in each
space around. Join to the top of the first DC (or equivalent chain)(48) (cut and tie yarn)


Round 3: Starting in any 2ch sp, work 2SC in each space, and 1SC into each DC of round 2. Slip stitch
into the first SC. (48) (cut and tie yarn)

Round 4: Counting the SC worked into the DC in the previous round as the third stitch, work 1 Vstitch
into the first SC of each repeat (it will look like the bottom of the V is directly above the DC of
round 2), join with a slip stitch into the first DC of the first V-stitch. (64) (16 Vstitches)
(cut and tie yarn)

Round 5: Starting at any V stitch in round 4, in the first DC of each V-stitch, work 3 trebles, ch2 slip
stitch into the top of the first treble (or the fourth chain) (80) (16 repeats) (cut and tie yarn)


Round 6: Starting in any chain space - SC in the chain space, work small shell in the middle treble of
each triplet from round 5 (112), end with a slip stitch into the first SC. (16 shells, 16 sc) (cut and tie
yarn)

OPTIONAL TO FINISH HERE
Round 7: Start in any SC. In each SC from round 6, work 4DC, chain 1. Work 1SC in 4th DC of the shell
in round 6, chain 1. Finish round with slip stitch into the top of the first DC. (112) (DO NOT cut and
tie yarn)

Round 8: Continuing from round 7, ch2 (counts as the first partial DC), work the first part of a DC in
the next three stitches as described in the cluster stitch above. Yarn over and draw through all four
loops. *CH10, skip the SC, work a cluster in the next four DC from round 7, repeat from * CH10, join
with slip stitch into the “eye” above the first cluster. (16 clusters, 16 ch10 loops) (cut and tie yarn)


Round 9: SC2 in any chain loop, ch3, work 1 treble in the top of the cluster, ch3. *3SC in loop from
round 8, ch3, 1treble in top of cluster from round 8, ch3. Repeat from * until you return to the
starting chain loop and work 1SC, and sl st in the first worked SC to join round. (16 trebles, 48 SC,
96CH) (cut and tie yarn)


Round 10: SC in second SC of any repeat in round 9. *Work 1 large shell in treble from round 9. SC in
next SC.** Repeat from * to ** until you return to the first SC – join with slip stitch. (16 large shells,
16 SC) (cut and tie yarn)


Round 11: Choosing any shell, start working *1SC in the second DC of the shell. Work two more,
then in the next (peak) work 2SC, work 1SC in the next 4 stitches. Decrease: draw up a loop in the
next two stitches, yarn over hook and draw through all three loops. **Repeat from * to ** until you
return to the first SC – slip stitch to join.
Positivity mandala hoop
https://attic24.co.uk/posts/positivity-mandala-hoop/

ROUND 1 : Use colour A
Chain 4, slip stitch into 1st chain to form a ring.
Chain 2 (counts as 1 dc); work 9 dc into the ring.
Slip stitch into the 2nd chain of the beginning chain-2 to close the round. Fasten off. [10 stitches]

ROUND 2 : Use colour B
Begin in any stitch.
Chain 3 (counts as 1 tr); work 1 tr into the same stitch (as shown above);

Work 2 tr into each of the next 9 stitches.
Slip stitch into the 3rd chain of the beginning chain-3 to close the round. Fasten off. [20 stitches]

ROUND 3 : Use colour C
Begin in any stitch.
Chain 3 (counts as 1 tr); work 1 tr into the same stitch; chain 2 (as shown above);
*Skip 1 stitch; work 2 tr's into the next stitch; chain 2*
Repeat between ** 8 more times;

Slip stitch into the 3rd chain of the beginning chain-3 to close the round. Fasten off. [10 tr groups and 10 ch-2 spaces]

ROUND 4 : Use colour D
Begin in any chain-2 space.

Chain 3 (counts as 1 tr); work 1 tr into the same space; chain 2; 2 tr into same space;
*work a double V-stitch in next chain-2 space* (as shown above);
Repeat between ** 8 more times;

Slip stitch into the 3rd chain of the beginning chain-3 to close the round.
DO NOT FASTEN OFF!!!!

Before you begin round 5, you will need to make 3 slip stitches to make sure you will be starting off in the right place.
1. Slip stitch into the top of the treble immediately to the left of where you closed round 4.
2. Slip stitch into the next treble.

3. Slip stitch into the chain-2 space immediately to the left (as shown by my needle in the above photo).
You are now ready to start round 5.....

ROUND 5 : continue with colour D
Chain 3 (counts as 1 tr); work 6 tr into the same space;
See where my needle is pointing in the above picture? This is the space between the double V-stitches.

Work 1 dc in the space between the double V-stitches ( as shown above);

*7 tr into next chain-2 space; 1 dc into space between V-stitches*
Repeat between ** 8 more times;

Slip stitch into 3rd chain of beginning chain-3 to close the round. Fasten off. [10 shells]

ROUND 6 : Use colour E
Begin in 4th (centre) treble of any shell.

Chain 12 (counts as 1 tr and chain-9);
*1 tr in 4th (centre) tr of next shell (shown by my needle in the above photo); chain 9*
Repeat between ** 8 more times

Slip stitch into 3rd chain of beginning chain-12 (shown by my needle in the above photo) to close the round.

Fasten off. [10 tr and 10 chain-9 loops]

ROUND 7 : Use colour F
Begin in the top of any treble stitch. If you aren't sure about this, have a good look at my hook in the above photo - the top of the treble stitch is the chain that sits slightly to the right of the post of the stitch (the sticky up bit if that makes sense!) Pass your hook under both loops, as shown by my hook above.

Chain 4 (counts as 1 tr plus chain 1);
Skip 1 chain;
*1 tr in next chain; skip 1 chain; chain 1*
Repeat between ** 3 more times;

You should have made 4 tr's along the chain-9 loop, with skipped stitches and chain-1's in between (as shown above).
Now see my needle? That's the top of the next treble stitch......
so work 1 tr into the top of this next treble stitch.

Skip 1 chain; chain 1;
*1 tr in next chain; skip 1 chain; chain 1*
Repeat between ** 3 more times;
1 tr into the top of the next treble stitch; skip 1 chain; chain 1;
*1 tr in next chain; skip 1 chain; chain 1*
Repeat between ** 3 more times;
Repeat the text shown in red until you arrive back to where you started.......

Slip stitch into 3rd chain of beginning chain-3 to close the round. Fasten off. [50 tr and 50 ch-1 spaces]
Now have a quick count to make sure you do have 50 stitches - this must be accurate or else the next round won't work out! Ask me how I know this????!!!!!

ROUND 8 : Use colour G
Begin in any chain-1 space.

Chain 3 (counts as 1 tr); 1 tr in same space; chain 2; 2 tr in same space;
1 dc in next space;
double V-stitch in next space; 1 dc in next space;

*double V-stitch in next space; 1 dc in next space;*
Repeat between ** until you get back to where you started.

Slip stitch into beginning chain-3 to close the round. Fasten off. [25 double V-stitches and 25 dc]

ROUND 8 : Use colour H
Begin in any chain-2 space.

Chain 3 (counts as 1 tr);; 1 tr in same space; chain 2; 2 tr in same space;
double V-stitch in next space (shown by my needle in the above photo);

*double V-stitch in next space*
Repeat between ** until you get back to where you started.

Slip stitch into beginning chain-3 to close the round. Fasten off. [25 double V-stitches]

ROUND 9 : Use colour C
Begin in any chain-2 space.

Chain 3 (counts as 1 tr); 4 tr in same space;
1 dc in space between double V-stitches (shown by my needle in the above photo);

*5 tr in next chain-2 space; 1 dc in space between double V-stitches*
Repeat between ** until you get back to where you started.

Slip stitch into beginning chain-3 to close the round. Fasten off. [25 shells]

I like to give my mandala a little bit of a light steam press and a gentle stretch after round 9, just to relax the crochet and even out any lumps and bumps.
Your mandala should be measuring around 25 or 26 cm across - ideally you need about a 2 cm gap all the way around between your mandala edge and the ring. You can test it out by gently pulling out the mandala and making sure it reaches to both sides of the ring ok - it should be tight! However, don't worry too much if you've only less than 2cm arounf, it'll just mean that it will end up a little looser inside the hoop.
Get your stitch markers ready, we're going to stretch and attach before we start crocheting the final round.......

I usually find that 5 or 6 markers will do the trick. Pass them through the 3rd/centre treble stitch of a shell, THROUGH BACK LOOPS ONLY, then attach the markers to the ring.

You'll probably find that the crochet stitch stretches quite a bit and looks rather big and loopy, but don't worry, it doesn't matter.
Ok......ready to begin? Here we go with the final round..................

ROUND 10 : Use colour B.
WORK IN BACK LOOPS ONLY (BLO) for this round.
Begin in the top of any dc, BLO. The top of the dc stitch will sit slightly to the right of the post of the stitch - I've shown you with my needle in the above photo where the top of the stitch is. Remember Back Loop Only.
Pull through a loop of new colour and Chain 1.

Work 1 slip stitch into each of the next 3 stitches (BLO). This will take you to the 3rd/centre tr of the shell.
Chain 3.

You will now need to move your working crochet and yarn to the back of the ring. So move your hook and crochet so that it sits to the back of the mandala, and push your yarn ball through to the back as well.

Pull your chain-3 against your ring, lifting it up and towards you so that it bends over the edge of the ring from back to front. Your yarn ball and working yarn will naturally come to the front again too.

Put your hook into the same back loop where your chain 3 was made......

.....and work a slip stitch to anchor the chain loop around the edge of the ring.
That's your first attachment made - only 24 more to go!!

Work 1 slip stitch into each of the next 6 stitches (BLO). This will take you to the 3rd/centre tr of the next shell.
Chain 3.
Pass your crochet, hook and yarn through the ring so that it sits at the back of the mandala.....

...then pull your chain-3 up and over the edge of the ring from back to front. Your yarn ball and working yarn will move to the front again.
Work 1 slip stitch into the same back loop where your chain 3 was made to form the attachment.

Work 1 slip stitch into each of the next 6 stitches (BLO). This will take you to the 3rd/centre tr of the next shell.
Chain 3.
Pass your crochet, hook and yarn through the ring so that it sits at the back of the mandala.
Bend your chain-3 over the edge of the ring from back to front so that crochet, hook and yarn moves to the front.
Work 1 slip stitch into the same back loop where your chain 3 was made to form the attachment.
Repeat the text shown in red, removing the stitch markers as you come to them.

There is a point where it all looks very wonky indeed and as if it won't possibly stretch and lay flat.
Don't panic!
Keep calm and carry on crocheting your slip stitches, gently stretching out the mandala as you work, easing those chain loops up and over the edge of the ring.

Eventually you'll arrive right back where you started. To close this round, we're going to use an invisible fastening off technique. When you've made a slip stitch in the last stitch, snip off your yarn and pull your hook upwards to extend the loop until the tail end pulls right out of the stitch. Take care not to pull the slip stitch tight.

Thread the tail end onto a darning needle. Pass the needle underneath the very first slip stitch you made in this round (shown in the above photo)

Now pass the needle down through the centre of the last slip stitch you made in this round, taking the tail end right through to the back of the work.

Pretty neat eh?!
You need to take care when you darn in your tail ends for each round of the mandala - you need to do some careful weaving of the needle and yarn underneath and through stitches so that you secure the ends but keep them as invisible as possible. Your mandala should look as good on the reverse as it does on the front.....now there's a challenge for ya!

Suscribirse a:
Entradas (Atom)